どうもTOM夫婦の旦那です!
今回は、ブログの"更新日"の表示設定を紹介します!
デフォルトでは、投稿日しか表示されません。
状況に応じて皆さん記事を更新されていると思いますので、投稿日だけを見て古いと思われないように、更新日も表記しておきましょう!
コードは下記の記事を参考にさせていただきました。
【コピペOK】【はてなブログ】更新日付を自動表示したい!設定方法を解説^^
【ブログカスタマイズ】記事の”更新日”をHTML,CSSで自動実装する方法紹介!
1.更新日の表記
当ブログのタイトルの上を見てもらえれば分かると思いますが、
左が投稿日。右が更新日になってます。

私は、少しだけ更新日の方の文字サイズを大きくしてます。
※はてなブログのテーマによっては、正しく動作しない場合があるようです。ご了承下さい。
2.記事下コード
// ↓自分のURL/sitemap.xmlに変更↓
url = 'https://www.tomfamilyworld.com/sitemap.xml';
// ↑自分のURL/sitemap.xmlに変更↑
コード内のこの部分だけをご自身のものに書き換えてください。
<!-- 更新日時表示 -->

<!--[if lt IE 9]>
<script src="http://ajax.aspnetcdn.com/ajax/jQuery/jquery-1.12.3.min.js"></script>
<![endif]-->

<!--[if gte IE 9]><!-->
<script src="http://ajax.aspnetcdn.com/ajax/jQuery/jquery-2.2.3.min.js"></script>
<!--<![endif]-->

<script>
;(function($) {
'use strict';
var urls = [], opts = {cache: false, dataType: 'xml'}, p,

// ↓自分のURL/sitemap.xmlに変更↓
url = 'https://www.tomfamilyworld.com/sitemap.xml';
// ↑自分のURL/sitemap.xmlに変更↑

function parseSitemapXML(url) {
var d = new $.Deferred;
$.ajax($.extend(opts, {
url: url
})).done(function(xml) {
$(xml).find('sitemap').each(function() {
urls.push($(this).find('loc').text());
});
d.resolve();
}).fail(function() {
d.reject();
});
return d.promise();
}
function findURL(url) {
$.ajax($.extend(opts, {
url: url
})).done(function(xml) {
var isMatched = false;
$(xml).find('url').each(function() {
var $this = $(this);
if ($this.find('loc').text() === location.href) {
isMatched = true;
appendLastmod($this.find('lastmod').text());
return false;
}
});
if (!isMatched) nextURL();
}).fail(function() {});
}
function nextURL() {
urls.shift();
if (urls.length) findURL(urls[0]);
}
function appendLastmod(lastmod) {
var $container = $('<div></div>', {'class': 'lastmod'}).text(lastmod.replace(/T.*0/,""));
if ($('.entry-header > .date').get(0).tagName.toLowerCase() === 'span') {
$('.entry-title').before($container);
} else {
$('.entry-date').append($container);
}
}
p = parseSitemapXML(url);
p.done(function() {findURL(urls[0])});
p.fail(function(error) {});
})(jQuery);
</script>
またJQueryおよびFont Awesomeの参照コードがまだ設定されていない方は、書きコードも追加で記述する必要があります。
すでに記述がある方は無視!
<!--「jQuery」参照URL-->
<script src="https://ajax.googleapis.com/ajax/libs/jquery/3.3.1/jquery.min.js">
</script>
<!--「Font Awesome」参照URL-->
<link href="https://use.fontawesome.com/releases/v5.5.0/css/all.css" rel="stylesheet">
3.CSSコード
好みに応じて、下記の設定を変更してください。
font-size: 18px; /*文字サイズ変更*/
color: #001E43; /*文字のカラー変更*/
カラーは下記を参考にどうぞ!
/*--更新日時表示--*/

.lastmod {
background-color: transparent;
padding: 5px 0px;
text-decoration: none;
font-size: 18px; /*文字サイズ変更*/
display: inline;
margin-left: 0px;
color: #001E43; /*文字のカラー変更*/
}

.lastmod::before {
margin-right: 5px;
margin-left: 10px;
padding-left: 3px;
font-family: "Font Awesome 5 Free";
font-weight: bold;
content: '\f01e';
}

.entry-date a {
background-color: transparent;
padding: 5px 0px 5px 6px;
text-decoration: none;
font-size: 15px;
display: inline;
}

.entry-date a::before {
margin-right: 5px;
padding-left: 3px;
}

/*--更新日時表示--*/
4.はてなブログに設定(PC)
4-1.記事下コードの記述
ダッシュボードのデザインをクリック

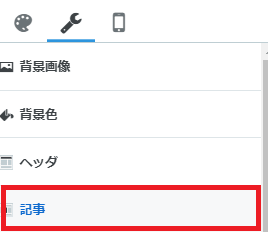
カスタマイズ(工具マーク)>記事をクリックし、展開

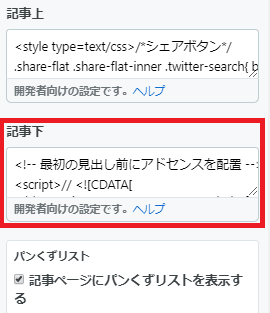
記事下内の記述枠に、記事下コードを記述

4-2.CSSコードの記述
ダッシュボード>デザインをクリック

カスタマイズ(工具マーク)>カスタムCSSの記述欄にコードを記述

5.はてなブログに設定(スマホ)
※レスポンシブデザインを採用している方は設定不要
私はスマホユーザー向けに最適化するため、スマホ版を個別にカスタマイズしているので、スマホ用も別途設定をしています。
詳しくは下記記事で紹介してます。
スマホ用のカスタマイズでは、カスタマイズCSSの記述欄がないので、記事下にCSSも記述します。
スマホ用コード
<!-- 更新日時表示 -->

<!--[if lt IE 9]>
<script src="http://ajax.aspnetcdn.com/ajax/jQuery/jquery-1.12.3.min.js"></script>
<![endif]-->

<!--[if gte IE 9]><!-->
<script src="http://ajax.aspnetcdn.com/ajax/jQuery/jquery-2.2.3.min.js"></script>
<!--<![endif]-->

<script>
;(function($) {
'use strict';
var urls = [], opts = {cache: false, dataType: 'xml'}, p,

// ↓自分のURL/sitemap.xmlに変更↓
url = 'https://www.tomfamilyworld.com/sitemap.xml';
// ↑自分のURL/sitemap.xmlに変更↑

function parseSitemapXML(url) {
var d = new $.Deferred;
$.ajax($.extend(opts, {
url: url
})).done(function(xml) {
$(xml).find('sitemap').each(function() {
urls.push($(this).find('loc').text());
});
d.resolve();
}).fail(function() {
d.reject();
});
return d.promise();
}
function findURL(url) {
$.ajax($.extend(opts, {
url: url
})).done(function(xml) {
var isMatched = false;
$(xml).find('url').each(function() {
var $this = $(this);
if ($this.find('loc').text() === location.href) {
isMatched = true;
appendLastmod($this.find('lastmod').text());
return false;
}
});
if (!isMatched) nextURL();
}).fail(function() {});
}
function nextURL() {
urls.shift();
if (urls.length) findURL(urls[0]);
}
function appendLastmod(lastmod) {
var $container = $('<div></div>', {'class': 'lastmod'}).text(lastmod.replace(/T.*0/,""));
if ($('.entry-header > .date').get(0).tagName.toLowerCase() === 'span') {
$('.entry-title').before($container);
} else {
$('.entry-date').append($container);
}
}
p = parseSitemapXML(url);
p.done(function() {findURL(urls[0])});
p.fail(function(error) {});
})(jQuery);
</script>


<!--「Font Awesome」参照URL(必要に応じて)-->
<link href="https://use.fontawesome.com/releases/v5.5.0/css/all.css" rel="stylesheet">
<!--「Font Awesome」参照URL(必要に応じて)-->
<link href="https://use.fontawesome.com/releases/v5.5.0/css/all.css" rel="stylesheet">


<style type="text/css">

 /*--更新日時表示--*/
.lastmod {
background-color: transparent;
padding: 5px 0px;
text-decoration: none;
font-size: 14px; /*文字サイズ変更*/
display: inline;
margin-left: 0px;
font-weight: bold;
color: #001E43; /*文字のカラー変更*/
}
.lastmod::before {
margin-right: 5px;
margin-left: 10px;
padding-left: 3px;
font-family: "Font Awesome 5 Free";
font-weight: bold;
content: '\f01e';
}
.entry-date a {
background-color: transparent;
padding: 5px 0px 5px 6px;
text-decoration: none;
font-size: 15px;
display: inline;
}
.entry-date a::before {
margin-right: 5px;
padding-left: 3px;
}

/*--更新日時表示--*/
</style>
上記のように、CSSコードを<style type="text/css"> ....</style>の間に記載します。
5-1.コードの記述
ダッシュボード>デザインをクリック

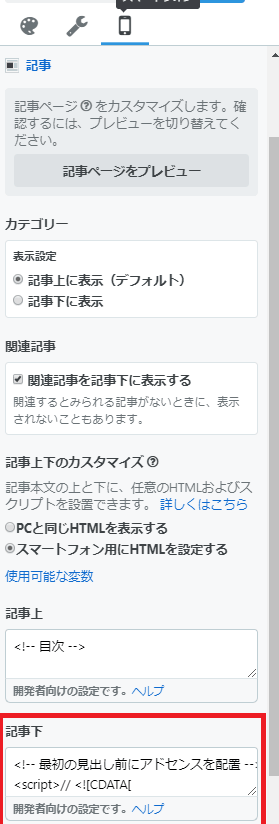
スマホ>記事>記事下へスマホ用コードを記述

6,最後に
うまく設定できましたでしょうか。
はてなブログの利用テーマによっては、イメージと違う表記のされ方になったという方もいらっしゃるかもしれません。。。
当ブログでは他にもはてなブログのカテゴリー設定、グローバルメニュー設定、コピーライト設定、ドメイン設定なども紹介してますのでチェックしてみてください!
www.tomfamilyworld.comでは、また!